Blog Archives - Rockwood Kitchens

Blog

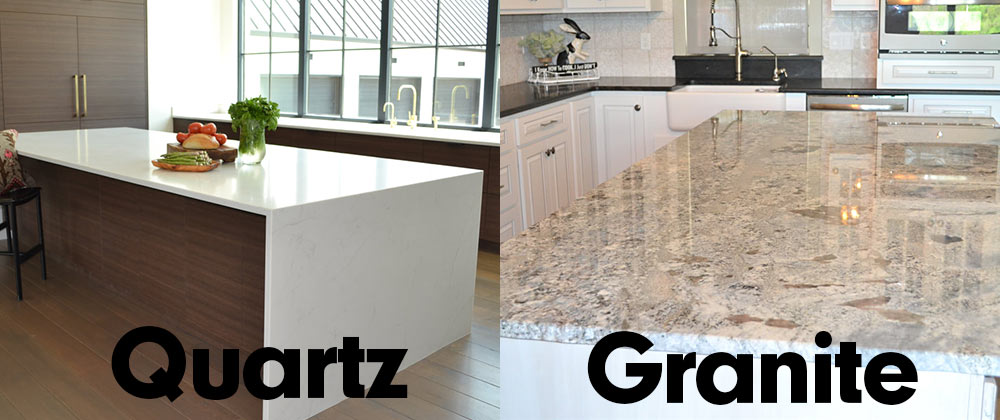
The Benefits of Quartz vs. Granite: Which Countertop is Right for You?

Introduction: When it comes to selecting the perfect countertop for your kitchen, two materials frequently come to mind: quartz and granite. Both options have their unique advantages and aesthetic appeal, making the decision challenging for homeowners. In this post, we will explore the benefits of each material, helping you determine which countertop is right for your kitchen.

  1. Understanding Quartz and Granite
  • Quartz: A man-made material composed of about 90-95% crushed natural quartz crystals combined with resins, polymers, and pigments. This process allows for a wide variety of colours and patterns, making quartz highly customizable.
  • Granite: A natural stone that is quarried and cut into slabs. Each granite slab is unique in appearance, showcasing the natural beauty of the stone with variations in colour and veining.
  1. Durability and Maintenance
  • Quartz:
    • Non-porous, which makes it resistant to staining and bacteria. This property means that spills can be easily wiped away without leaving a mark.
    • Resistant to heat and scratches and chips although care should still be taken as damage is possible with excess exposure.
    • Requires minimal maintenance; regular cleaning with soap and water is usually sufficient.
  • Granite:
    • Extremely durable and resistant to heat, scratches, and chips. However, it is porous and requires sealing every 1-2 years to prevent staining.
    • While maintenance is slightly higher than quartz, regular cleaning and sealing can keep granite looking beautiful for years.
  1. Aesthetic Appeal
  • Quartz:
    • Available in a wider range of colours and patterns due to the manufacturing process. It can mimic the appearance of natural stone or offer vibrant colours and unique designs.
  • Granite:
    • Offers a timeless, natural look that appeals to many homeowners. Each slab has a unique pattern, adding a sense of individuality to your kitchen.
  1. Cost Considerations
  • Quartz:
    • Generally more affordable than granite, with prices varying based on quality and design. Installation costs can also be lower due to the ease of handling and cutting.
  • Granite:
    • Typically comes at a higher price point, especially for exotic varieties. The cost may also increase based on the complexity of the installation process.
  1. Environmental Impact
  • Quartz: The manufacturing process can consume more resources and energy. However, many quartz brands are now using eco-friendly practices and sustainable materials.
  • Granite: Being a natural stone, it has a smaller carbon footprint if sourced locally. However, transportation of granite can increase its environmental impact.

Conclusion: Ultimately, the choice between quartz and granite comes down to personal preference, lifestyle, and budget. Quartz offers versatility and low maintenance, while granite boasts natural beauty and durability. Consider your kitchen’s design and how you plan to use the space to make an informed decision.

Maximizing Space in a Small Kitchen: Design Tips from Rockwood Kitchens

Small kitchens can be challenging, but with the right design strategies, you can maximize every square inch to create a functional and stylish space. Here are some expert tips from Rockwood Kitchens to help you make the most of your small kitchen.

1. Opt for Open Shelving

Open shelving is a great way to create the illusion of more space. It allows you to display your favorite dishes and decor while keeping essentials easily accessible. Consider floating shelves above countertops to free up cabinet space and make the kitchen feel airier.

2. Choose Multi-Functional Furniture

In a small kitchen, every piece of furniture should serve multiple purposes. Look for an island with storage options or a dining table that doubles as a prep space. This way, you maximize functionality without overcrowding the room.

3. Utilize Vertical Space

Make the most of your vertical space by installing cabinets that extend to the ceiling. This not only provides additional storage but also draws the eye upward, making the kitchen feel larger. Use the top shelves for items you use less frequently.

4. Light Colours and Reflective Surfaces

Incorporating light colours, such as whites and soft pastels, can make a small kitchen feel more open and inviting. Additionally, using reflective surfaces, such as glossy tiles and stainless steel appliances, can enhance natural light and create a sense of spaciousness.

5. Smart Storage Solutions

Invest in smart storage solutions like pull-out drawers, corner cabinets, and lazy Susans to maximize accessibility. These features allow you to utilize every nook and cranny of your kitchen efficiently, keeping it organized and clutter-free.

Conclusion

Designing a small kitchen doesn’t have to be daunting. By utilizing open shelving, multi-functional furniture, and smart storage solutions, you can create a space that feels both spacious and functional. For personalized design solutions tailored to your kitchen, Rockwood Kitchens is here to help.


man, write, plan-593333.jpg

Planning your kitchen renovation

A kitchen can be one of the hardest rooms of the house to renovate requiring many more decisions than any other room. When done correctly however, there is no reason the process needs to be a long and difficult one. The following article outlines the process step by step so you get a dream kitchen and not a kitchen nightmare.


SET GOALS – DETERMINE THE SCOPE OF YOUR PROJECT
One of the first things to determine when starting a kitchen renovation is the scope of the work required. Consider the current layout and condition of your existing kitchen and make a wish list of the items you would like to change. Maybe your kitchen is in good condition and a countertop replacement is a great way to update the look without breaking the bank. Other kitchens will require a full renovation and include a new floor, cabinets, countertop, hardware and new appliances. Whichever side you find yourself on, the best way forward is to start by creating a design and fine tune your goals.

START WITH A PLAN – WORK WITH A DESIGNER
A great way to start a kitchen project and keep it running smoothly is to work with a designer or kitchen consultant. A quick design consultation can help answer some of your questions and are usually free. The goal for the designer will be to understand the scope of the project and get a sense of the future kitchen you are trying to create. This way you get a more accurate quote based on a physical design.

The design will give you good sense of what the final design will look like and a detailed list of the items included in your quote. Removing most of the guess work and reducing the chance of unexpected cost. A good kitchen supplier will offer 3D photorealistic images so you can see how your color selections are coming together and see if the design is matching up with the kitchen you imagined.

CREATE YOUR LOOK – COLOR AND MATERIAL SELECTIONS
There are many choices of colors, styles, materials and patterns for every element within the kitchen. Figuring out where to start can be a little overwhelming. You can begin with cabinet color and style selections and match other elements to them or select a quartz or granite pattern and start matching to it. There is no right or wrong way to begin. A good rule would be to start with the big items first and work back to the small details. Since the cabinets and countertop are the most visual elements, determine the design style and typically make up a large part of the budget, these elements make obvious points.

SEE YOUR VISION – CREATE A FIRST DRAFT DESIGN
Some kitchen companies’ offer free or fee based design services. They can create a first draft design based on your description, wish list and project goals in order to provide an accurate quote. A basic sketch of the room with measurements and some details about your new or existing appliances is all a designer would need to get started with a floor plan and estimate.

Depending on the number of alterations in the new design you may also need the services of a tile installer, a plumber and/or an electrician. The floor plan is useful for these trades to estimate a more accurate price as they have a clear picture of the work to be done.

COMPARE QUOTES – ESTIMATED COST vs BUDGET EXPECTATIONS
You now have the quotes and estimates and it’s time to see if your project goals are aligned to the budget. You may find yourself below or close to your original budget expectations and ready to move forward or over budget and asking yourself some tough questions.

MAKE CHANGES – REVIEW AND REVISE THE PROJECT AND DESIGN
When a projects estimated cost are above your set budget you will have 3 options. Increase the budget, reduce the cost or purchase cheaper products.

Eliminating some decorative items or choosing a less expensive countertop are ways to reduce a budget fast without sacrificing too much of the overall look. The project could also be done in stages with the main kitchen installed first and an island, decorative features or a pantry added at a later date. This would generally cost a little more in the long run however as the installer would have to return and set up for construction a second time.

You could simply purchase cheaper cabinets and countertops however be sure to lower your expectations regarding longevity. You may get the overall number of cabinets you preferred but the kitchen may look inexpensive and flimsy. There is an ideal balance between quantity, quality and cost so be cautious of sacrificing too much of one or the other.

Several revisions may be needed to get the design and budget aligned but remember not to get caught up in the details. Unless you are considering big changes or a completely different layout your initial estimates will not change much and you may be doing more work than needed.

MAKE FINAL SELECTIONS – SCHEDULE INSTALLATION
One of the last things you will need to do is make final selections on the supplier, installer and trades you want to work with, pay required deposits and create an installation schedule. Ideally when the renovation includes a new floor you will want to remove the old kitchen and replace the old floor before installing the new kitchen. This could mean several weeks without a usable kitchen, make sure to give yourself plenty of time to plan and coordinate the installers and trades and prepare your temporary cooking arrangements as required.

DOUBLE CHECK – FINAL MEASURE AND SITE VISIT
Most kitchen suppliers who also offer installation will come out to your home for a final measure to confirm the design is accurate. This allows for a smoother installation and avoids extra cost and issues.

If you are doing a self-installation you are typically responsible for confirming the details of the design and layout. Make sure to do plenty of re-search if you are new to this type of work, and be sure you have all the necessary tools before starting the project.

TIME TO START RENOVATING – CABINET AND COUNTERTOP INSTALLATION
When just replacing the countertop, installation can take a few hours to a day. Remove the old countertop a day or several hours before delivery of your new countertop to reduce down time.

More complex renovations will start with a complete removal of the countertops, cabinets, backsplash and/or floor. The demolition phase can be done through the kitchen supplier, contractor or make it a DIY project.

Cabinet installation can take anywhere from 3-7 days depending on the size and complexity of the design. After the lower cabinets are installed it’s time to template for your new countertop. This takes generally takes less than an hour with modern equipment. Delivery and installation of the stone will take between 1-3 weeks on average. The kitchen is somewhat usable before the countertop is in place. The range, range hood, microwave and refrigerator can usually be operational.

COMPLETION – THE FINAL TOUCHES
After the main elements are in place you can now install a backsplash, handles, place appliances, stock cabinets and start enjoying your kitchen.

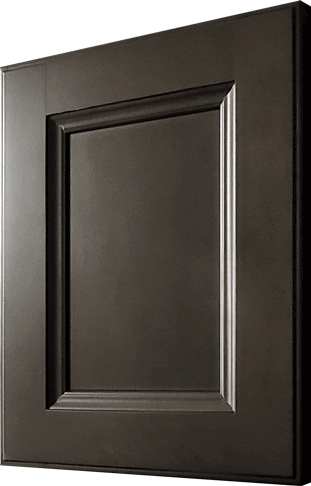
London Grey Sample Door

Our New London Grey Cabinet Collection

The newest addition to the Rockwood Cabinetry Collection now available!

Rockwood kitchens is pleased to announce that we have added a new cabinet style to the Rockwood cabinetry collection. After one of our company co presidents traveling to the other side of the world to oversee that everything ran smoothly in the production of our new product we finally have gotten the colour and style perfect! This new cabinet is called “London Grey” and offers a very sleek, modern contemporary look. London Grey is now available in stores and online so come in and talk to one of our designers today about getting your free quote!

RockWood Kitchens . Affordable Custom Cabinetry . Granite . Quartz

BarrieOrilliaCollingwoodNewmarketVaughan – Woodbridge – TorontoGTA
MississaugaPickeringAjaxKawartha LakesHamiltonBurlingtonMiltonOakvilleKitchener